Getting Started

In this course you’ll learn how to create a dynamic website on the Internet using HTML, CSS and JavaScript.  To accomplish this you’ll need a few things:

  1. The course textbooks
  2. A web server to host your web site
  3. A domain name for your web site

Below are instructions on how to obtain each of these.


Textbooks

The textbook information for the course can be found at bridgewater.textbookx.com and for your convenience is provided below.

JavaScript: The Definitive Guide, 7 Edition
David Flanagan
9781491952023

This is an excellent text.  It covers all of JavaScript, including new features.


Domain Names

Domain names are leased on a year-by-year basis through a registrar.  Once we register a domain name we have an option to renew it, year after year, before someone else can lease it.  Each registrar sells domain names for a subset of the top level domains (TLDs).  For example, godaddy.com is a registrar for these TLDs.

The cost of registering a domain name depends on the TLD that you choose.  A .com domain name, for example, costs less than $10 per year, whereas a .io domain name might cost $45 per year.

Some TLDs are restricted.  For example, to register a domain name under the .edu TLD, we have to represent an accredited educational institution.  A list of the original TLDs (.com, .org, .net, etc) as well as all of the other TLDs can be found here.

Domain names can contain alphanumeric characters (a-z 0-9) along with the hyphen so long as they’re not used for the first or last character in the domain name.  Finding the right domain name can sometimes take a long time because the ones we want may have already been registered.


Web Site Hosting

Every web site consists of a collection of files (html, css, javascript, php, images, etc).  These files have to reside on a computer that has a web server running on it.  We can download, install, and configure a web server on our own personal computer (so long as our internet service provider allows it) or we can purchase a hosting plan from a web host provider.  A web host provider, provides space on computers that already have web servers running on them.  They maintain the hardware and the server so all we have to do is add our web files.

We need our web server to have the following properties:

  1. We need the server to run a Linux operating system.
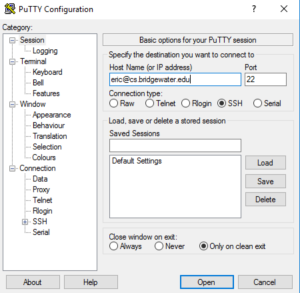
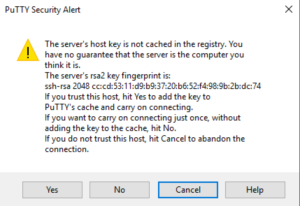
  2. We must be able to log into the machine using SSH.  This will allow us to log into the server and modify our files.

Purchasing a Doman Name and Hosting Plan

For this course you’re required to purchase a hosting plan and a domain name.  I recommend you use Godaddy.com with the coupon GDD1hos which gets you a domain name for 1 year and  12 months of hosting.  All Godaddy.com coupons can be found here.

To get the discount, from the home page search for a domain name and when you’ve found one, add it to your cart.  Be careful to uncheck all of the extra products that they’ll try to see you and choose 1 year of registration for the domain name.  They’ll try to sell you 3 or 5 years.

Once you have a domain name added to your cart, navigate back to the Godaddy.com home page and press the Web Hosting button.  Choose the Economy package. Again, unclick the extras that they’ll try to sell you.

Once you’ve added a domain name and hosting package, check the following:

  1. Make sure the hosting plan is a Linux hosting plan.
  2. Hit the trash can next to Office 365 Starter Email – you don’t need that.
  3. Set the duration for your domain name lease and hosting to 1 year.

Now, find the box below the Subtotal that reads, “Have a promo code?” and enter GDD1hos. You should see a total Subtotal of $12.00 as shown below.


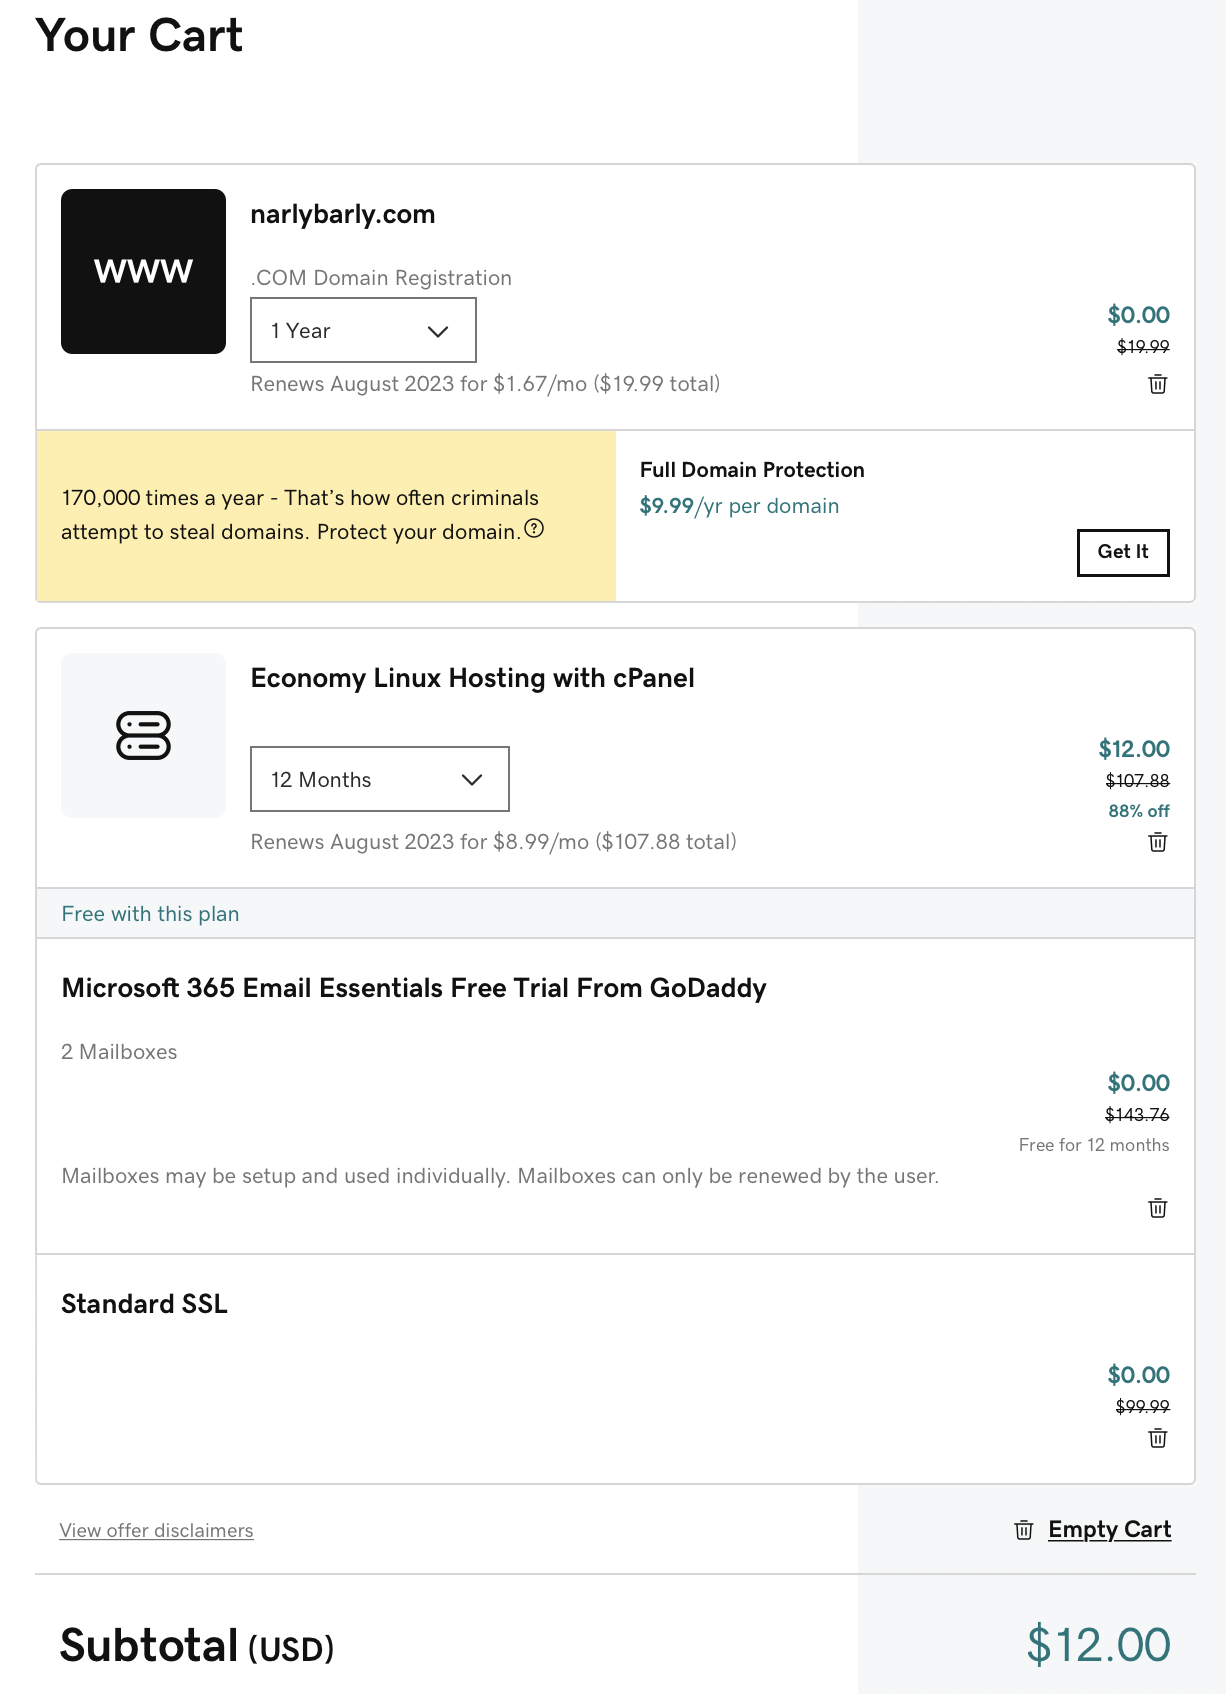
Once you are satisfied, purchase the hosting plan and domain name, and email me your domain name.


Linking your Domain Name to Your Hosting Plan

If you own more than one domain name (I own 3), Godaddy needs to know which domain name you want associated with your hosting plan.

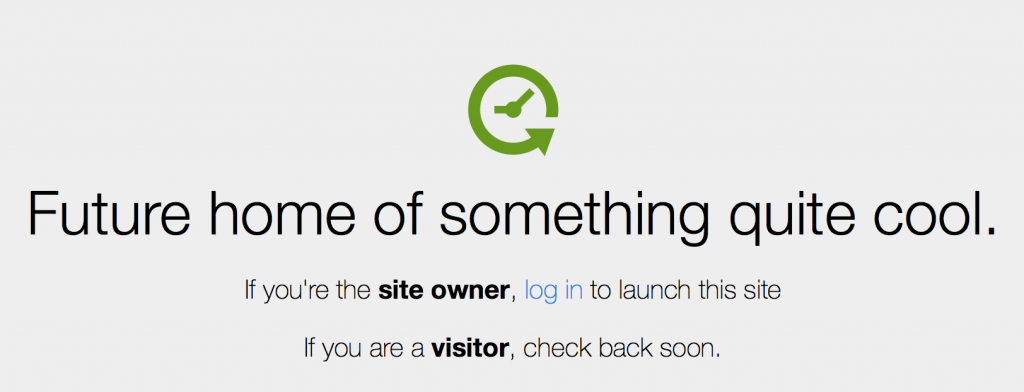
To set this up, log onto Godaddy.com and click your name in the upper right corner of the main Godaddy.com page.  When you do so, a drop-down menu will appear.  In the drop-down menu, press the button labeled My Products.  A page displaying all of the products that you’ve purchased will be displayed.  Under the Web Hosting section you should see Economy Linux Hosting with cPanel.   If you see a button labeled Set up, press the Set up button and follow the prompts to associate the domain name you purchased with the hosting plan.  Note:  When you see a prompt asking you if you want to set up a WordPress site, choose No.

When you are done, enter your domain name in a browser.  You should see a page that looks like this.


Enable SSH on Your Host Account

We’ll be using programs that use SSH (Secure Shell) to connect remotely to our host machine. Before we do so we need to enable SSH on the host. Below are instructions on enabling SSH on your new Godaddy.com host account.

  1. Log into your Godaddy account if you’re not logged on already.
  2. Click your name in the upper right hand corner of the screen and choose My Products from the drop-down menu.
  3. Click the Manage button next to your hosting plan.
  4. On the right side of the screen is a pane titled Settings with two tabs labeled Account and Server.  Click on the Server tab.
  5. Write down the IP address, we’ll use this later.
  6. If SSH is Off, click on Manage next to SSH access and toggle SSH access to On.

Well, that’s all for now.  Don’t forget to email me your domain name.

Using VSC for Web Dev

Set Up A Local Directory Structure

Create a directory on your laptop’s hard drive that has the name of your website.  For example, I have a directory named n0code.net.  Inside that directory create a subdirectory named public_html.  We will place all of our files for our website in the public_html directory.

Download Visual Studio Code (VSC)

You can find it at https://code.visualstudio.com.

Create a Home Page

Start VSC and on the splash page choose Open.  The app will open a file picker.  Choose to the public_html file that you created earlier.

Now in VSC, create a file in public_html named index.html and add the following HTML code to the file.

<!doctype html>
<html>
  <head></head>
  <body>
    <h1>My Home Page</h1>
  </body>
</html>

Set up Automatic Upload

Next we’ll setup VSC to automatically upload our files to our server when we save the files.  To do this we need a VSC extension.

Click the Extensions icon on the left side of the VSC app.  Search for SFTP and install the SFTP extension by Natizyskunk.

Click the Explorer icon on the left side of the VSC app to close the Extensions search and open the file explorer pane.

In the VSC toolbar, choose View and then Command Palette...  In the Command Palette, search for SFTP:Config and choose it from the drop down box.  This should open a file named sftp.json.

Edit the sftp.json file using the following as a template.  Note that you will need to replace the highlighted items to reflect your hosting account’s information.

  • host: Replace with your domain name.
  • username: Replace with your cPanel username.
  • password:  Add the password property and replace 12345678 with your cPanel password.
  • remotePath: Replace the underlined part of the path with your cpanel username.

After you’ve made the necessary changes, save the file.

Test the SFTP Connection

In VSC, open your index.html file and save the file.  If successful, on the left side of the bottom edge of VSC you should see SFTP change to done index.html and then change back to SFTP.

Open a browser and navigate to your webpage.  You should see the index.html page you created.

Remote Login with SSH

SSH

SSH stands for secure shell.  It is a protocol used to establish a secure encrypted communication channel between a client program on a local computer and a server program on another host computer.  In order to use SSH, however the user on the local machine must have valid credentials (username and password) for the remote host.  With SSH, a user on one machine can log into another and issue commands on the remote machine.

SSH on Windows

Putty is a GUI based SSH client for Windows.  Installation of Putty is easy, just go to their download page and download and run either the Windows installer or a pre-compiled executable (you’ll most likely need the 64-bit version).  Below are instructions on how to establish a basic connection.  For information on all of the features of Putty, consult the Putty User Manual.

When you start Putty you’ll see a screen similar to the one shown below.  To establish a connect to a remote host, in the field labeled Host Name or IP address, enter username@hostname where username is a valid username on the remote host and hostname is a domain name or IP address of the host that you are trying to log into.  Note: IP is an abbreviation for Internet Protocol.

The first time you attempt to log into the host, you will see a screen similar to the one below asking you if you trust the host machine.  Press ‘Yes’.

Next, you will be asked for your password.  Please enter your password and press ‘Enter’.  Once your credentials are verified, you will be logged into the remote machine and shown a command prompt.  From the command prompt you can traverse the file system and execute commands.

SSH on MacOS

Macs have a SSH program named Terminal already installed on them.  When you launch the Terminal app you’ll immediately see a command prompt.  From here you’ll be able to issue UNIX commands including the SSH command which allows remote login.

In order to log into a remote machine from the terminal command prompt, type ssh username@hostname where username is a valid username on the remote host and hostname is the name of the host or IP address of the host that you are trying to log into.  After you’ve issued the ssh command, press enter.

The first time you attempt to log into the host, you will see a message similar to the one below asking you if you trust the host machine.

The server's host key is not cached in the registry. You
have no guarantee that the server is the computer you
think it is.
The server's rsa2 key fingerprint is:
ssh-rsa 1024 7b:e5:6f:a7:f4:f9:81:62:5c:e3:1f:bf:8b:57:6c:5a
If you trust this host, hit Yes to add the key to
PuTTY's cache and carry on connecting.
If you want to carry on connecting just once, without
adding the key to the cache, hit No.
If you do not trust this host, hit Cancel to abandon the
connection.

Type Yes and press enter.  Next, you will be asked for your password.  Enter your password and press enter.  Once your credentials are verified, you will be logged into the remote machine and shown a command prompt.  From the command prompt you can traverse the file system and execute commands.

Linux and Vi commands

If you search the web for ‘linux cheat sheet‘ you find numerous one-page documents that list the most commonly used Linux commands.  I recommend that you print or bookmark one to help you learn them.

Navigating the File System

Some of the most common commands that we’ll use are for listing the files within a directory and moving around the file system.

  • pwd
  • ls
  • ls -l
  • ls -al
  • cd /
  • cd $HOME
  • cd ..
  • cd [dir] (absolute or relative path)

UNIX directory structure

Standard-unix-filesystem-hierarchy

Manipulating Directories and Files

  • mkdir [dir]
  • rmdir [dir]
  • mv [src] [dest]
  • touch [file]
  • cp [orig] [new]
  • cp -r [src_dir] [dest_dir]
  • rm [file]
  • rm -r [dir]    (BE CAREFUL!)
  • chmod [mode] [file]

Displaying File, Manual, Environment and System Information

  • cat [file]
  • man [command]
  • which [command]
  • whereis [command]
  • env
  • whoami
  • hostname
  • date
  • clear

Viewing and Killing Processes

  • ps
  • ps -ax
  • kill [pid]
  • kill -9 [pid]

Pipes

  • [command] | [command]
  • cat filename | less

Vi – The Editor of Champions

  • Insert Mode (i)
    • arrow keys
    • delete
  • Command Mode (esc)
    • x – delete char
    • r [char] – replace char
    • dd – delete line
    • # dd – delete multiple lines
    • u – undo last command
    • yy – copy to clipboard
    • # yy – copy multiple lines
    • p – paste contents of clip board
    • v – visual mode
    • $ – go to the end of a line
    • 0 – go to the beginning of a line
    • shift + G – go to the end of the file
    • shift + H – go to the beginning of the file
    • :# – goto line a particular line
    • :/search_term – search for a particular term
    • :%s/old/new/g – find and replace
    • :w – write the file
    • :q – quit vi
    • :x – write and quit
    • :q! – quit without writing
    • :set number – show line numbers
    • :set nonumber – hide line numbers

Transferring Files with SFTP

SFTP

SFTP is a protocol that allows a client program running on one computer to establish a secure communication channel with a server program running on a remote host and transfer files from one machine to the other.  In order for a user to establish an SFTP connection to a remote host, they must possess valid login credentials on the remote machine.

On Windows

Filezilla is a time-tested GUI-based SFTP client that allows a user to transfer files between a local computer and a remote host.  The software can be downloaded from their download page.  For Windows users the win64-setup.exe file is recommended.  Just download and install.

Below are basic instructions on how to use Filezilla using the Quickconnect bar.  Please consult the user documentation or information on all of the features available in Filezilla.

To connect to a remote host, in the Host field type sftp://hostname where hostname is the domain name or IP address of the host you are trying to connect to.  Then enter your username and password in their respective fields and press the Quickconnect button.

Once a connection is established, the file system for your local machine is accessible from the file system tree in the bottom left pane and the file system for the remote host is accessible from the file system tree in the bottom right pane.  Files can be transferred from one computer to the other by simply dragging and dropping the files.

On MacOS

Filezilla is also available to MacOS users, but don’t be silly and download it – you are much better than that.  You are a master of all things UNIX and so you, like I, transfer files directly from the Terminal application.

To establish a SFTP connection with a remote host from the terminal app’s command line, enter the following command sftp username@hostname where username is the username on the remote computer and hostname is the domain name or IP address of the remote computer.  As with the ssh command, you may be asked if you trust the host.  If so, type Yes and press enter.  When you are prompted for a password, enter the host password and press enter.

After your credentials have been verified you’ll see an ftp prompt.  From there you can issue ftp commands.  Type help to see a list of all of the ftp commands available.  You’ll most likely, however, only need the following commands: ls, lls, cd, lcd, get, and put.

  • At any point in time, the sftp program keeps track of your current working directory on your local machine (initially the directory you where in when you launched the sftp program from the command line) and your current working directory on the remote machine (usually your home directory).  Files are transferred from the current working directory of one computer to the current working directory of the other computer.
  • To view and change the current working directory of the remote host you can use the ls and cd commands, respectively.
  • To view and change the current working directory of the local machine you can use the lls and lcd commands, respectively.
  • To transfer a file from the remote machine to the local machine enter get filename where filename is the name of the file that you wish to transfer.
  • To transfer a file from the local machine to the remote host, enter put filename where filename is the name of the file that you wish to transfer.

Creating a WebStorm Project With Automatic Upload

One way to maintain a website is to develop your entire website on your local machine and have the WebStorm IDE automatically upload to your remote host any changes you make locally.  This strategy is by far faster than using SFTP to transfer each file up to your server when you’ve made a change to them.  Its also better in that you automatically maintain a backup of your site on your local machine which you wouldn’t have if you SSH-ed into your host and modified the files directly on your host.

To set this up we need to do the following:

  1. Request a Free (for Students) copy of WebStorm
  2. Create a new WebStorm project
  3. Create a remote server configuration in WebStorm
  4. Download the files you already have on your remote host to your local pc

Request WebStorm for Free

JetBrains allows students to download WebStorm for free.  So follow this link and request the free download.  Please use your BC email address when applying for the student account.

Once you have the download file, install the software.

When installing the software, you’ll need to activate the software.  To do so, Choose Get License From: JB Account and enter your BC email address and JB password.


Create a New Empty WebStorm Project

From the WebStorm initial window select Create New Project.  Choose Empty Project and in the location field choose a name for the folder on your local machine that you will put all of your web site files in.  I chose to put all   of my web files in a folder named public_html since that is the name of the folder that Godaddy created for our web files on the host server.  That makes my local file system an exact mirror of my remote file system.


Create a Remote Server Configuration in WebStorm

The following instructions are from the WebStorm tutorial found here.  To create a remote server configuration, choose File->Settings->Build,Execution,Deployment->Deployment from the main menu bar.  Then click the (+) button in the center pane to create a new deployment configuration.  Give the deployment a name and choose SFTP for the type. Enter your domain name in the SFTP host field and enter your cPanel username and password in their respective fields.  Check the Save password check box.

I’ve included my deployment configuration screens below for comparison.  Note: I’m using a Mac so the screens may appear slightly different on a Windows machine.

Set the server deployment as the default deployment by pressing the Use as default button.

Click on the Mappings tab and configure it similar to the mapping shown below. Change the Local path field to point to your WebStorm project’s directory.  This is the same directory that you chose when you created the project.

Next, configure WebStorm to automatically upload changes to your remote host.  The instructions below are from the tutorial found here.

In the left hand pane, click the triangle next to Deployment to reveal Options.  Select Options and select Always from the drop down menu next to Upload changes files automatically to the default server as shown below.

Click Apply to save and OK to close the deployment configuration window.  You are now ready to start adding files to your web site.


Download the Files on Your Remote Host to Your Local PC

If you’ve already uploaded files to your remote host with SFTP or if you’ve created files directly on your host by logging in remotely with SSH, then you may need to download to your local computer the files (and directories) that are already up on the remote host.

To do so, on the toolbar, press Tools -> Deployment -> Browse Remote Host.  This will open a new pane on the right hand side of the IDE that shows you all of the files on your remote host.  To download a folder or file, highlight the folder or file then click your mouse button to bring up an options menu.  Choose Download from here.  When you do, the file or folder (with contents) will be copied from the remote host to your local machine.  You may need to collapse then expand your project root on the left hand pane in order to see the copied contents.